
Remember, today is the tomorrow you worried about yesterday.
Dale Carnegie
Introduction
So you’re ready to move to the cloud. Great news! You are not alone. According to Gartner, by 2022, 75% of all databases will be deployed or migrated to a cloud platform, with only 5% ever considered for repatriation to on-premises. The benefits of cloud storage are numerous.
Here are few reasons why moving to the cloud makes sense:
- “Pay as you go” – This is a hallmark of cloud-based services and it means that you are only paying for services that you use. So rather than outlaying lots of money for a big database server (or even a server farm), you are paying for storage on a monthly or annual basis. Database storage and compute becomes an operating expense rather than a capital expense.It should be said that there are multiple fees associated with data storage, such as read / write operations, hot / cool / cold tier services, and replication or geo-location fees. How you provision and use your new cloud-based storage can do a lot to reduce your overall bill.
- Regular Backups – Cloud-based database and file services have gotten smart about data backups. Now, you can specify that certain tables or files need to be replicated 3 or more times, to different data centers even (in case one takes an asteroid hit). In many cases, these backups can be setup for “auto failover”, meaning that should an interruption of service occur, it can automatically bring a backup of your data online to keep you up and running.
- Flexibility – Cloud-based services give your business multiple options for data storage, so you can fine tune your solution to exactly what you need. AWS, for example, enables file-based storage via their S3 service and then allows SQL access to the data in those files via AWS Athena and AWS Redshift Spectrum. This allows you to build a hybrid system of “right now” (ie. hot) accessible data in AWS Redshift, with “cool” data (typically larger datasets) living in S3, that can all be examined with one SQL query. All the major cloud players (AWS, Azure, Google Cloud) have this capability in one form or another.
Also, you can try out complementary services like Azure Machine Learning and AWS SageMaker to open new avenues of advanced analytics and at-scale data modeling.
Still here? Great! On our previous Migration post, we talked about Azure and Amazon Web Services storage solutions.
The focus this time is on how to upload file-based data to AWS specifically and set it up for some quick analytical wins. There are several factors to consider, such as how your data is structured, and how you plan to use it in reporting and analytics.
What’s Your Perfect, Ideal Solution?
We all have to start somewhere with a cloud-based data solution, but it helps to have an end goal, a vision for the platform, the data it contains and how it will be used. This post will cover how to move file-based data (primarily text files) to AWS S3 and make it available for analytics via AWS Athena, a SQL-based interactive query service. But what else? What could this become with time and effort?
- Build an ETL (Extract, Transform, Load) process that keeps the data in AWS S3 (and downstream data services like Athena) up to date.
- Move more BI-focused datasets to AWS Redshift, a true analytics database engine that is optimized for reporting. This would open the data to client-based reporting tools such as Tableau, Microsoft PowerBI, AWS Quicksight, and others. These tools need results quickly so keeping some of your data “closer to the surface” in a relational database means that the most common views and insights can be served up immediately. Raw data that we want to retain “just in case” or for deeper analysis could remain in the ad-hoc and more flexible AWS S3 / Athena setup.
- Setup notifications on ETL and data quality issues, such as when a table receives zero records for a day. This would allow developers to jump on problems early before they cause problems downstream.
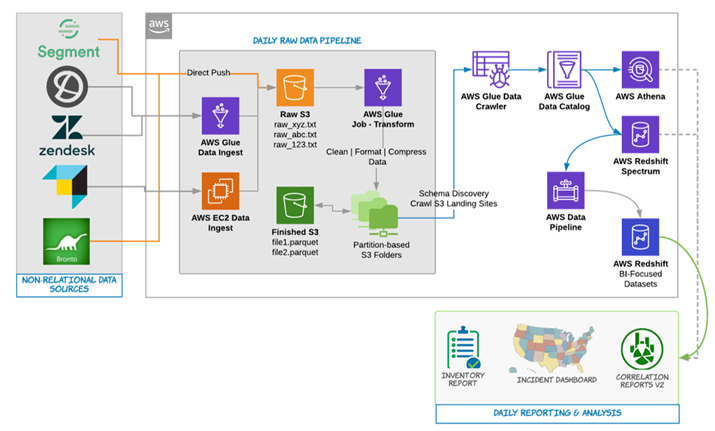
All of this is possible, and people do it every day on modern, cloud-based platforms such as AWS. Not to get ahead of ourselves, but below is the workflow for a robust data platform eSage Group put together for a major manufacturing client using AWS Services. All services used here are part of the AWS Platform and included the use of AWS S3 and Athena:
For anyone with questions on how to do this or how to setup your own custom solution, please contact eSage Group.
First things first, though. Let’s learn more about the two services we’ll be using today: AWS S3 and Athena.
AWS S3 & Athena

AWS S3
stands for “Simple Cloud Storage” and is Amazon’s ubiquitous cloud-based storage system. Everyone can get (at time of this writing) a free AWS account that includes 5GBs of S3 storage. It can store just about any form of data, including text files, image files, binary files, et.
Notice we are using the term “files” here a lot. That’s because everything in S3, even something very un-file like, such as a string of bytes or 10 seconds of video, is contained in an S3 object and given a file name. These “files” live in an S3 bucket, which is not unlike an Azure Storage Container, from which we can manage redundancy, access policies, and other settings.
AWS S3 has several storage tiers or classes that center around how your data in S3 is used. To me, regardless of tier, data stored in S3 will never be in the “hot” category – data that can be immediately fetched, aggregated, and used in reporting. Instead, think of these as different forms of warm and cold:
S3 Standard:
This tier is the general-purpose tier that most people use. It offers the lowest latency and highest throughput of the tiers and is setup to survive events that impact an entire Availability Zone. According to the AWS page, this tier is ideal for a “wide variety of use cases, including cloud applications, dynamic websites, content distribution, mobile and gaming applications, and big data analytics”.
S3 Intelligent Tiering:
Not sure if you need frequent or infrequent access to your S3 data? Then this tier is for you. It keeps your data into two different tiers, one for frequent and one for not so frequent access, and then it moves your S3 objects back and forth between the tiers depending upon how frequently they are accessed. There is a small “automation” fee for doing this work but if you have a lot of data with random (or unknown) access patterns, this tier can save you money.
S3 Standard-Infrequent Access (S3 Standard-IA):
Ideal for “long-term storage, backups, and disaster recovery”, the S3 Standard-IA tier is designed for objects that need less frequent access, but still delivers rapid access when needed. The page says that it has “the same low latency and high throughput performance of S3 Standard”, so this tier is really for objects that have a long lifespan. If you are constantly inserting, removing, and updating objects in an S3 bucket, use the S3 Standard tier. If your objects are relatively stable and not likely to change, move them to the S3 Standard-Infrequent Access tier. Data that is deleted from this tier within 30 days will still be charged the full 30 days.
Since this tier has data that is all about long-term storage, the cost of moving data in and out is higher. For instance, a PUT, COPY, POST, or LIST request in the S3 Standard tier costs $0.005 (per 1K requests), while the S3 Standard-IA tier costs $0.01 (so double). You’ll see this trend as you drop to lower tiers. Storage cost goes lower but access cost and, more importantly, time to access your data goes higher.
S3 One Zone-Infrequent Access (S3 One Zone-IA):
Stores data in the same manner as S3 Standard-IA, but is stored only in a single Availability Zone, as opposed to 3. This means it has less protection but also comes in about 20% cheaper than the S3 Standard-IA tier.
S3 Glacier:
This is the cold storage where you are happy with access times ranging from 1 minute to 12 hours. It is designed for companies that need to keep data around for years and need access to it very infrequently. If this isn’t cold enough for you, there is also S3 Glacier Deep Archive, which is the lowest tier level. Usually for disaster recovery or compliance scenarios, it is designed for super long-term storage and data is only meant to be retrieved a few times a year. It boasts the lowest storage costs and is a “good alternative to magnetic tape systems” (people still use those?). Objects need to remain for a minimum of 90 days (180 for Glacier Archive) to avoid an additional processing fee. Access fees are also higher. Whereas the S3 Standard tier cost $0.005 for PUT, COPY, POST, and LIST requests and S3 Standard-IA costs $0.01, Glacier and Glacier Archive costs $0.05. That’s 5x more than the Standard-IA tier!
A note about the different storage tiers: You can apply these tiers at the bucket level or at the object level within a bucket. Also, you can setup “S3 Lifecycles” that can move objects to a lower (less expensive, less frequent) tier after a certain point in time.
You can learn more about the different tiers here and about AWS S3 pricing here.
There are plenty of S3 tutorials online, so this post assumes you have adequate AWS permissions and can create an S3 bucket. A good starting place is Amazon’s official Getting Started with S3 documentation.

AWS Athena
is essentially a cloud-based, server-less SQL query service that is based on modernized version of Facebook Presto and Apache Hive. It layers a schema, including column definitions and file format, over file-based data (such as lives in S3) and combines this with an on-demand, scalable query optimization engine.
As a database, these tables exist primarily for read-only use cases. For instance, deleting a table in Athena doesn’t affect the real data it was referencing back in AWS S3. Also, you “update” these tables by putting more recent data into the AWS S3 folder that the table references. Note that this is different from a more traditional database service like AWS Redshift, where deleting tables does remove data.
What this means is that, unlike a traditional database, you are not paying for storage as part of your Athena bill. You are already paying for AWS S3, a very cost-effective storage platform, and Athena simply reads the data from there.
Note that you are charged on the amount of data scanned for each query you run. The AWS Athena pricing page, says that you are charged $5.00 for every TB (terabyte) of data scanned (US West region).
On the same page, right below that line is the following:
You can save from 30% to 90% on your per-query costs and get better performance by compressing, partitioning, and converting your data into columnar formats.
So true and we’ll delve more into this later. The key point to remember about Athena is that your tables are really definitions. The file format, columns, partitions, and other attributes you specify inform the service of how your data is structured in S3 so that your SQL query can be most effectively executed.
Wait! What about Redshift Spectrum?
Yes, AWS Redshift Spectrum is another cloud-based query service engine and could work in our example with little to no changes. Like Athena, it overlays a schema on file-based data located in S3 or elsewhere and you pay “per query” on the amount of data scanned. Unlike Athena; however, Spectrum requires an existing AWS Redshift cluster to work.
If you are already using AWS Redshift, then adding Redshift Spectrum to the mix can be a great way to expand your existing database platform cheaply. It also has the added benefit of being able to pull data from both Redshift tables and external tables in Redshift Spectrum via one query.
However, if you do not already have a Redshift cluster, it is not necessary to analyze data in S3. Just use AWS Athena. 😉
Moving Data to S3
So Many Tools, So Little Time
AWS has several ways of uploading data to S3. I am assuming you have already created an AWS S3 Bucket for storage, but if you haven’t yet, the AWS documentation will get you started.
You can upload your file-based data to AWS S3 in several ways:
1. Via the AWS Console
This is the easiest way, but it does require you to have access to the AWS Console. This is a unique permission that can be given to AWS Users on an AWS Subscription. If you have such access, then navigate to the S3 Service and select the AWS S3 Bucket that you want to upload data to. In the Overview tab, click the Upload button and then Add Files.
Next to the Upload button is a Create Folder button, which you can use to (you guessed it) create folders for different types of data. For instance, if I have web traffic data from several sites, I might create folders to reflect that and place the data into folders “site1”, “site2”, “site3”.
As you think about how the files should be stored and what folder structure to use, consider how your users will query and analyze this data. Will it be by date, by region, by department, or a combination of these? Knowing ahead of time the most likely way to analyze data will allow you to store that data in the most efficient way possible. See the “Some Thoughts on Storage” section for more information.
If you have more than a few files to copy, the AWS Console can get tedious and it’s best to consider the other options below.
2. Via the AWS CLI
The AWS Command Line Interface (CLI) is the uber tool for developers and power users. It can easily be wrapped into a shell script (like Bash, PowerShell, et) to programmatically move lots of files at once and stores them in the correct location. You can get started with the AWS CLI here.
As a bonus, the AWS CLI supports more than just S3. You can manage EC2 instances, configure Redshift clusters and databases, and administer Virtual Private Networks. Just about any AWS service can be accessed via the AWS CLI so if you are using more than just S3 or need to move files programmatically then this tool is a must.
Once you install the AWS CLI (V2 at time of writing), you will need to configure it so it knows who you are and where your AWS Subscription is located. Typing aws configure in the command prompt will allow you to enter in your AWS credentials:

This AWS Help Doc has more information about where to find your Access Key and Secret Access Key (part of your IAM user account). It saves this information for future use in a profile called default.
As with any of the AWS CLI commands, you can learn more about it by calling help. Putting help at the end of any command will pull up it’s “how do I use this” documentation:

As you can see, by appending “help”, I can learn more about the “mv” (move) command within the AWS CLI S3 space. There are commands to create an S3 bucket, list all your S3 buckets, list files inside your buckets, move and delete files, and more. You can learn more about all these commands in the AWS Documentation.
In order to copy a file or folder up to an S3 bucket in AWS, I would use the following command:
aws s3 cp file.txt s3://my-bucket-uri/
If you need to copy an entire folder and its subfolders and their contents, a better command is sync:
aws s3 sync . s3://my-bucket-uri/
This would copy the contents of the current directory up to the S3 bucket and maintain the folder structure. See the period there in the command? That means “current directory”. NOTE: Deletions are handled with the option “–delete” flag, see the documentation for more details.
If I have more than just a very simple folder structure, the AWS CLI would be my choice since I like the flexibility and the fact that it can be wrapped into a shell script for more frequent operations.
Again, having your files and folders structured according to how the data will be analyzed first will speed things up considerably. If you had this done, you could then just call aws s3 sync on that directory and have the entire folder structure copied up to S3 in one go!
The disadvantage of the AWS CLI is that there is no visual interface, so it is mainly for people who are comfortable with the command prompt.
3. Via Other Tools
There are many 3rd party tools out there that facilitate moving data to AWS S3. Here are a few of the ones I have worked with or heard of:
S3 Browser – This free tool has a slick FTP-style interface that allows you to upload files to AWS S3 and AWS CloudFront (AWS’s Content Delivery Network). It has numerous features, such as the ability to only move changed files, handle encryption, and perform multi-threaded downloads and uploads. NOTE: Windows Only.
Cyberduck – Cyberduck supports not just AWS S3, but also FTP, SFTP, Azure Blob Storage, Google Drive, DropBox, OneDrive, and more. While I prefer S3 Browser for its singular purpose and easy to use interface, if you are using more than one cloud-based storage system, Cyberduck is hard to beat.
WebDrive – Another do-it-all tool, Webdrive has the additional trick of integrating into your Windows Explorer or Mac Finder and treating your AWS S3 (or Google Drive or Azure Blog Storage, et) as just another drive on your computer. According to reviewers, it takes a little bit of time to get used to but the notion of mounting a drive to a folder in the cloud is appealing. C Drive is for your local Windows files, D is for your work and family photos, and E is for my AWS S3 bucket! 😉
Don’t (De)limit Yourself
Before you move any file-based data to the cloud, it is a good idea to understand the type of data in the files and how it is structured. Generally, these are files that contain text, such as web activity logs, product reviews, customer lists, and so on.
Each file should have its own structure, meaning a common delimiter, which is a character that separates values in each row of data. Sometimes, this is a comma: these files are called CSV files (comma separated value). Other times a Tab character is used: these are called TSV (tab separated value) files. It can also be something totally random, like a % or &. As long as it is a value that is consistent across the file (or set of files) being uploaded, we can inform the Athena query service about it and it will know how to handle the data.
If your data is not delimited than this needs to be fixed. How would someone interpret this one row of data?
123545jasonmoredata(234) 998-2244toledoakusadisabled
To me, all of this would go in column #1 in a table that has only one column. Not very useful for analytics. With a delimiter, however, things become much clearer:
123545,jason,more,data,(234) 998-2244,Toledo,ak,usa,disabled
Now, we know that you expect this data to live in a table with 9 columns and even have a pretty good idea what the column names should be. Even better would be if values were quoted. This gets around issues like having the delimiter in the value itself:
“123545”,”cannelos, jason”,”more”,”data”,”(234) 998-2244”,”Toledo”,”ak”,”usa”,”disabled”
Note how we expect “cannelos, jason” to be brought into one column, not two. The quotes make this possible. As we’ll see later, we can specify in our Athena table that our values are quoted so the query service knows what to expect. Something like quoting values isn’t required but we’ve seen many an upload fail because of delimiters showing up unexpectedly in values.
Some Thoughts on Storage
Moving your data up to file-based storage is a good start; however, there are several ways to make your data both take up less space and process faster when being used by cloud-based data services such as AWS Athena:
Data Compression / Storage Formats
Especially useful for text-based data, compressing your data files can result in a 20x or better reduction in the overall size of a file. There are is a number of compression formats, such as ZIP, GZIP, SNAPPY, BZ2, ZLIB, et, and all have benefits and tradeoffs in terms of compression size and performance.
Also, certain data services may not support a certain compression format so be sure to do your research before choosing a format for your file-based data. It is usually upon you to compress your data first in the format of your choosing, and then have your chosen tool upload the data to S3.
Don’t feel like compressing the data yourself? We’ll cover how to get Athena to do this part for you in another section below.
Wait, what about ORC, Avro, or Parquet? Ah, good question! These are actually storage formats (more precisely columnar formats) as opposed to compression formats and they change how the data itself is stored in a file. Parquet in particular is very popular and actually does some compression, but these are really designed to organize the data in each file so that a query engine can retrieve specific columns from a table without having to unwrap or decompress the entire file. This can greatly speed up performance, particularly in tables with many columns since a query rarely needs everything all the time.
There are also ways to combine storage formats with compression formats for better performance. For instance, it is a fairly common practice to specify that your Athena table has a columnar or storage format of Parquet but is also compressed using Snappy. Another example is using Orc with Zlib.
Compressing the data yourself can be done pretty easily using a free application like 7-Zip.
For moving your data into a new storage format, like Parquet, I would let Athena do the heavy lifting for you. We’ll cover that in another section below.
A Note on Batch Processing:
If you require the regular movement and clean up of data (using Athena or another service), I would recommend AWS Glue in keeping with an all AWS data platform. Glue is a fully managed ETL – extract, transform, and load – service that can move, clean, partition, and prep your datasets for reporting and analytics. What’s more, it can keep your Athena table’s partitions and schema up to date based on changes to the backend data files stored in S3.
While this post is dealing with a few files and manual uploads, anything that needs to happen on a schedule would benefit from using AWS Glue. I mention the Glue Data Catalog service a little later in this post, but that is only a portion of what this service can do. Hey, perhaps that could be the next topic in the blog series! 😉
Partitioning
Partitioning is the process of properly storing your data for how it will be analyzed. Imagine a scenario in which you need data for a date range like 2018-09-15 – 2020-10-05 and this is how your files are structured in AWS S3 or some other file-based storage:

All database engines today, be it cloud-based or on-premises, analytical or transactional, utilize something called a query engine to translate your SQL into the most efficient way to get your data to you quickly. How is the query engine supposed to know specifically where your data is? If it is unable to do so, it will literally decompress, open, and examine every file in your dataset! If you have a lot of data, this will get expensive in terms of time and resources, fast.
However, if you stored your data into sub-folders, such as date, it would look like this:

If the query engine is aware of this folder structure – that is, it is aware of your table’s partitions and where they are located – it only has to open those folders that correspond to the date range in your query (the WHERE or JOIN clauses) and can return data much faster.
Date is not the only way to partition data. For instance, let’s say you had a data structure like this:
Region
Department
Date
You can partition your data into a series of folders that makes sense for downstream reports:

With a SQL query like this:
SELECT REGION, DEPARTMENT, DATEPART(MONTH, ACTIVITYDATE), COUNT(*)
FROM MYTABLE
WHERE YEAR(ACTIVITYDATE) BETWEEN 2017 AND 2020
AND DEPARTMENT IN (‘Marketing’, ‘Manufacturing’);
The query engine would know exactly where to go in your S3 bucket and exactly which folders to examine for the data. Compare that to a non-partitioned table and you would have to scan everything for what could really be only a few files worth of data.
Partitioning a dataset is more than just setting up files in certain folders. You also need to inform Athena in your table definition that this table is partitioned and where those partitions live. This can be somewhat arduous with a lot of partitions, as we will see later, but it doesn’t have to be.
Let’s cover how to create a partitioned table in AWS Athena.
Creating Your First Table:
1. Open the Athena Console at https://console.aws.amazon.com/athena/home.
2. Click the Create Table link. You can choose “from S3 bucket data” or “from AWS Glue Crawler” (topic for another day).
3. Follow the Wizard prompts:

As you go through the wizard, you will point your table to the S3 path where your data actually lives, give it a Data Format (remember the compression / storage chat earlier?) and define your columns. You can specify your Partitions here as well – basically, you are saying which “columns” are partitioned but these are really giving names to the different levels of subfolders you have setup in S3.
If you want more fine-grained control, you can write SQL directly and run it in the AWS Athena console:
CREATE EXTERNAL TABLE users (
 first string,
 last string,
 username string
 )
 PARTITIONED BY (id string)
 STORED AS parquet
 LOCATION 's3://bucket/folder/'
Note how the partitioned column “id” is not in the formal column list. Since this is basically Apache Hive (there are some differences), you can get quite complex with your table definitions.
For instance, this non-partitioned table uses a special “SerDe” – a Serialization / Deserialization library – to wash rows of data through a Regular Expression before being defined into columns:
CREATE EXTERNAL TABLE IF NOT EXISTS cloudfront_logs (
 `Date` Date,
 Time STRING,
 Location STRING,
 Bytes INT,
 RequestIP STRING,
 Method STRING,
 Host STRING,
 Uri STRING,
 Status INT,
 Referrer STRING,
 OS String,
 Browser String,
 BrowserVersion String
 ) ROW FORMAT SERDE 'org.apache.hadoop.hive.serde2.RegexSerDe'
 WITH SERDEPROPERTIES (
 "input.regex" = "^(?!#)([^ ]+)\\s+([^ ]+)\\s+([^ ]+)\\s+([^ ]+)\\s+([^ ]+)\\s+([^ ]+)\\s+([^ ]+)\\s+([^ ]+)\\s+([^ ]+)\\s+([^ ]+)\\s+[^\(]+[\(]([^\;]+).*\%20([^\/]+)[\/](.*)$"
 ) LOCATION 's3://athena-examples-MyRegion/cloudfront/plaintext/';
So just because your data is not in the perfect format, don’t think that you can’t use it in AWS Athena! 😉
Setting Up Partitions
It is setting up partitions that can be the challenging part. In fact, there is a whole other AWS service called Glue, that is designed to do this for you. It uses a “crawler” to examine your S3 folder structure on a set schedule and keeps your table’s partitions up to date in the Glue Data Catalog, which is the metastore location for services like AWS Athena and Redshift Spectrum. Glue is out of scope today, but Jane from AWS has a cool video here explaining all about it here.
It’s fine if you’ve specified which columns are partitions; however, each partition requires an explicit location path of its own. For instance, certain rows of data will exist at:
Region = ‘Southwest’
Department = ‘Marketing’
Date = ‘2020-07-01’
This partition location would be located at ‘s3://mybucket/mytabledata/Southwest/Marketing/2020-07-01/’. Here is how you would add this particular partition to your new table:
ALTER TABLE mytable
 ADD PARTITION (Region = ‘Southwest’, Department = ‘Marketing’, dt = ‘2020-07-20’)
 LOCATION ‘s3://mybucket/mytabledata/Southwest/Marketing/2020-07-01/’;
Now, imagine doing that for all your partitions! In our previous example, that would be:
Regions:10
Departments:6
Dates:1,825 (5 Years’ worth of daily data)
That is 10 X 6 X 1825 = 109,500 separate partitions! Not something I would not want to be coding manually.
Fortunately, Athena has an easy fix. Once your table is setup, you can run the following command to tell Athena to rebuild the partition tree by walking down your S3 folder structure:
MSCK REPAIR TABLE mytable;
You can then query the table and get back results. Remember to include your partitioned columns in your WHERE and JOIN clauses! Otherwise, they are doing you no benefit and the query engine will have to scan every file at your table location.
Using Athena To Compress / Format Data
Since Athena is a collection of table definitions, you can use it to “move” data into and out of different compression and storage formats. This can be useful if you don’t have the capacity to perfectly structure the data in your files before loading it up to S3. Here is the basic premise:
- Load raw, uncompressed data up to S3. Using one of the tools mentioned above, just get your files uploaded in S3 as is. The only requirement is that it is properly delimited.
- Create a base Athena table that points to the raw data. This would be a very simple table with no storage, compression, or partitioning specified (the columns would be different for your data, of course):
CREATE EXTERNAL TABLE myrawdata (
 first string,
 last string,
 username string,
 field1 int,
 field2 string,
 shipdate string
 )
 ROW FORMAT DELIMITED
 FIELDS TERMINATED BY ‘,’
 LOCATION 's3://my-bucket/raw_data/';
Note the “ROW FORMAT DELIMITED FIELDS TERMINATED BY ‘,’ lines. This is how you tell Athena that this is normal text file delimited by commas between the values. Athena will use the standard SerDe – a Serialization / Deserialization library – called LazySimpleSerDe, to process your data (no need to specify it).
If, however, you have values enclosed in double quotes like this:
“esage”,”group”,”Athena,rocks!”,”other”,”value”
Then you should use a special SerDe – a Serialization / Deserialization library – for your table called OpenCSVSerde:
ROW FORMAT SERDE ‘org.apache.hadoop.hive.serde2.OpenCSVSerde’
 LOCATION ‘s3://my-bucket/raw_data’;
This library handles cases like this and has some other options as well. You can learn more about this SerDe here.
One last tip on raw data table creation. If, for any reason, you need to skip the first line(s) of a file, use TBLPROPERTIES:
LOCATION ‘s3://my-bucket/raw_data’
 TBLPROPERTIES (“skip.header.line.count”=”<number of lines to skip>”);
3. Next, create another S3 location that is empty. It could be a whole new S3 bucket or just a folder in the existing bucket. Here, I’ll use the AWS CLI to get this done:
aws s3api put-object –bucket s3://my-bucket –key data/
This will create a folder underneath the S3 bucket. Note that slash at the end of “data/” is important! It tells AWS that data is meant to be a “folder”. This is not a folder like on your PC. Remember how everything in S3 is an object? That includes folders. These are just empty objects with a label for the folder name; however, in the AWS console and other tools, it will behave just like a folder.
4. Now create a new Athena table pointing at the new S3 location. It should have the exact same schema (list of columns) as the myrawdata table, but here we can specify our storage and compression formats:
CREATE EXTERNAL TABLE mydata (
 first string,
 last string,
 username string,
 field1 int,
 field2 string,
 shipdate string
 )
 STORED AS parquet
 LOCATION 's3://my-bucket/data/'
 tblproperties ("parquet.compression"="SNAPPY");
5. Next, we INSERT into the mydata table while SELECTing from the myrawdata table:
INSERT INTO mydata (first, last, username, field1, field2, shipdate)
 SELECT first, last, username, field1, field2, shipdate
 FROM myrawdata
 ORDER BY shipdate;
This basically copies the data from one S3 location to another; however, if you now go look at the files in the “data” folder, they will all end with “parquet”. Your dataset has now been optimized!
You can use this same concept to have Athena partition raw data as well. This has some limitations, such as only being able to create a maximum of 100 partitions at a time, but it is a powerful feature nonetheless. You can read more about CTAS (Create Table as Select) and dynamic partition creation here.
Again, if you need to create thousands of partitions (and keep them up to date), enlisting the AWS Glue Data Catalog Service and a Glue crawler can save you a lot of manual typing. 😉
Conclusion
Congratulations on taking your first foray into the cloud! We covered a lot of ground today, but we have just scratched the surface on what AWS S3 and Athena can do for storing your data and preparing it for analysis and reporting. There are numerous ways to get your data landed in S3 and then different approaches you can take to standing up Athena tables to analyze your data. Also covered was how to leverage Athena to optimize your data by moving it through a table that has superior storage and compression formats. A good point to keep in mind is that partitioned columns cannot help with query optimization unless you use them in the WHERE or JOIN clauses of your SQL query. 😉
S3 and Athena can both be used by downstream AWS services such as Glue, Redshift, Sagemaker, and Data Pipeline to make a flexible, scalable, and cost-effective data platform. Also, most reporting tools today, including Tableau, Microsoft PowerBI, AWS Quicksight and Looker, can all connect to AWS Athena to build effective visual reports and dashboards. However, no matter how much the dataset is optimized, a query service like Athena is not designed for speedy requests. At some point, consider moving business focused data into a true relational platform such as AWS Redshift to get better reporting performance.
Thanks for reading and best of luck to you in your cloud journey! We’ll see you next time on the Great Data Migration blog series!
About eSage Group
eSage Group provides best practice offerings in Data Strategy, Data Engineering, Visualization and Data Science to augment internal teams and help you move quickly toward an optimal marketing analytics platform with effective customer acquisition, retention, and engagement.
With certified specialists across a range of technologies, including Salesforce, Snowflake, AWS, and Azure, plus 20 years of experience extracting value from customer data, eSage Group will help you efficiently integrate any data source and amplify the value of data across your organization.
Ready to learn more? Contact eSage Group today!